Getting Started
To get started with Cicada, create an account by logging in with your GitHub account.
Once you've created your account you will land on a dashboard similar to this one:
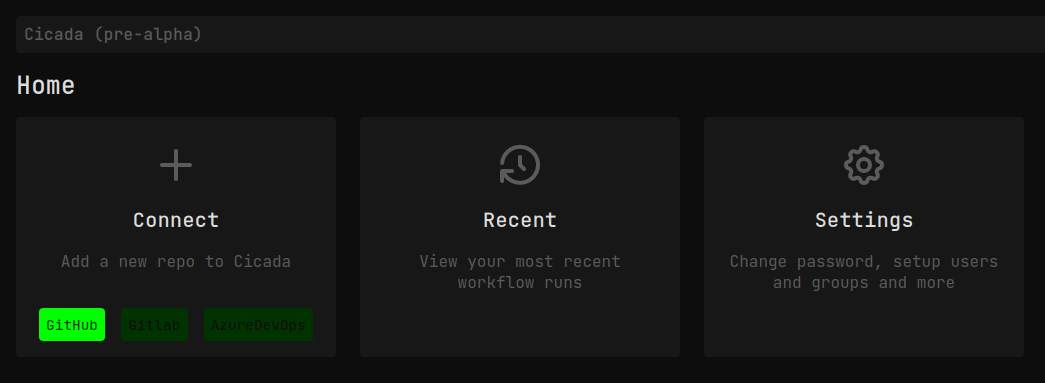
Click the "GitHub" button to authorize and connect Cicada to your GitHub repositories. You can allow Cicada access to a select list of repositories, or to all your repositories if you prefer. You can always come back and change this later.
Once you've done this you can start writing workflows in Cicada! Click here to learn more.
FAQ
Does Cicada support Matrix Builds?
Yes, in the form of sub-workflows.
Does Cicada support secrets?
Yes! Read the secrets docs for more info.
The Cicada DSL
The Cicada DSL (Domain Specific Language) is the programming language that powers Cicada. This language is specifically designed for writing automation workflows.
Keep reading to learn how to start writing workflows with Cicada!
The Cicada DSL is often referred to as "the Cicada programming language", or sometimes just "Cicada". "Cicada" may be used to reference the Cicada platform itself, so when that distinction is unclear, "the Cicada DSL" will be used instead.
Your First Workflow
This is an introduction to the Cicada DSL (Domain-specific language). This DSL can be used for defining workflows, which includes CI/CD (Continuous Integration/Continuous Deployment), automated testing/backups, and much more. The Cicada DSL (which may be referred to as "The DSL" or just "Cicada") was designed from the ground up to meet the growing needs of DevOps engineers, Full-stack engineers, or anyone else who spends a lot of time writing and maintaining CI/CD workflows.
Before you get started, make sure you've setup Cicada for your repository or organization. For info on how to set this up, see the Getting Started docs.
To get started, create a file anywhere in your repository ending in .ci. One advantage of Cicada is that you
can structure your workflows however you want, and are not limited to a single .yaml file or .github folder
for all your workflows.
In your workflow file, add the following:
on git.push

echo Hello World!
This workflow file will run every time there is a git push to a repository. The echo command is a built-in
shell alias, meaning you can use it as if it where a built-in command. For less common commands, prefix it with
the shell command:
shell whoami
Click here to learn more about the shell statement.
To make sure that your workflow works, try pushing to your repository. If you are using GitHub or Gitlab, you should see a green check next to the commit indicating that the workflow completed successfully. Clicking on the commit and viewing the details should take you to the Cicada website which will show you the workflow output and other important information.
Your Second Workflow
Now that you've created your first workflow, where can you go from here?
Conditional Workflows
You can add a condition to the on statement to only run a workflow under certain conditions:
on git.push where event.branch is "main"

echo I am running on the main branch!
This workflow will run for every commit to the main branch of your GitHub repository.
Variables
Yes, you heard that right! Cicada is a full-fledged programming language, allowing you to define variables and use them in commands:
let message = "hello world"

echo (message)
This workflow defines a variable called message, which is passed using string-interpolation. Any expression
wrapped in parenthesis (that is in a command such as echo) will be evaluated, converted to a string, and
finally be passed to the command, in this case, echo. Think of this like f-strings in Python, or string interpolation
in C#, except they only work with commands (and a few other places as well).
For more information on the let expression click here.
Secrets
Secrets allow you to securely use sensitive data (like API tokens) in your workflows:
shell poetry publish -u __token__ -p (secret.PYPI_DEPLOY_TOKEN)
Read the docs for more information about how to use secrets in your workflows.
What's Next
Now that you've familiarized yourself with the basics of Cicada, keep reading to learn more about the many features that Cicada has to offer.
The on Statement
The on statement allows for only running a workflow when a certain event occurs. For example,
this could be a git push, an issue/PR being opened, etc. For a full list of available events and
available metadata, see the event types docs.
Basic usage of the on statement looks like this:
on git.push

echo Hello world!
This will run "Hello world!" whenever a push event is received. You might not want to respond to all
git push events though. In those situations, you will need to use an on statement with a where clause:
on git.push where event.branch is "dev"

echo This will only run on the dev branch
As the echo command suggests, this workflow will only run when code is pushed to the dev branch.
The event variable is a globally-defined variable which includes the metadata associated with the
push event. The most important part about the event variable is that it works cross-platform: this means
that this workflow can be ran on GitHub and Gitlab, and the behaviour will be exactly the same!
Keep in mind that different events have different fields. To see a full breakdown of the available events and their fields, see the event types docs.
Limitations
In order for Cicada to run your workflows properly, there are certain limitations to the on statement.
- You cannot execute functions before the
onstatement. The following workflow is not valid:
echo Running before the on statement

on git.push
- You cannot define multiple
onstatements. This feature might be added later, but does not exist yet.
Event Types
Here is a short run-down of the available triggers and their field types:
All Events
Every event has the following fields:
sha: The SHA of the commit that this workflow is running for.
provider: The Git provider we are running for (either github or gitlab).
repository_url: The URL of the repository that the workflow is running for.
default_branch: The default branch of the repository.
git.push
author: GitHub/Gitlab username of the commit author, or unit (()) if a username can't be collelated (ie, bots).
message: The commit message of the most recent commit that was pushed.
committed_on: An ISO 8601 datetime of when the commit was authored.
ref: The full git ref pointing to the commit (ie, /refs/heads/main).
branch: The short-name of the branch which was pushed to (ie, main).
issue.open
id: Platform-dependant ID for the issue.
title: Title of the issue.
submitted_by: Username of the user who opened the issue.
is_locked: Whether or not the issue is locked.
opened_at: ISO 8601 datetime of when the issue was opened.
body: Body of the issue.
issue.close
Everything in issue.open, and:
opened_at: ISO 8601 datetime of when the issue was closed.
The run_on Statement
The run_on statement allows you to tell Cicada which operating system or environment to run your workflows in.
Run on Docker Image
Cicada Currently supports OCI images when using the image flag
meaning you can use any image you like as the basis for your workflow.
The basic syntax of the run_on statement looks like this:
run_on image alpine:3.18
Now when Cicada runs this workflow, it will run it using the alpine version 3.18 image.
It is recommended that you always use a version for your images to allow for Cicada to better
cache your container images.
By default, Cicada uses the docker.io registry. To use a different registry, use the fully
qualified registry when specifying the image:
run_on image docker.io/alpine:3.18
Run on Self-Hosted Runner
Self-hosted runners are an experimental feature in Cicada that allows you to run your workflow on prem
using your own hardware. To use self-hosted runners, add the following code to your .ci file:
run_on self_hosted

echo Running on a self hosted runner!
This will tell Cicada to use a self-hosted runner for executing your workflows, assuming you have already setup a self-hosted runner with Cicada. There is currently no way in the UI to create a self-hosted runner, so you will need to reach out to contact@cicada.sh to add or delete a self-hosted runner.
Restrictions
The run_on statement is only allowed in certain places. Essentially, for Cicada to be able to
detect what image to run your workflow in, the run_on statement needs to be near the top of the
file before any commands have been ran (since they would need to be ran on a computer).
The following are examples of invalid usage of the run_on statement:
# Ok, defined near the top of the file
run_on image alpine

# Invalid, `run_on` can only be specified once
run_on image ubuntu

if true:
  # Invalid, `run_on` must be defined at the top level
  run_on image alpine

echo hello world!

# Invalid, `run_on` cannot be used after running a command
run_on image alpine
The title Statement
The title statement can be used to give a name for your workflow.
Use the following syntax to add a title to your workflow:
title Your title here!
Similar to function calls, you can include expressions in your title, and they will be reflected in the title:
let name = "Testing"

title Running (name) Workflow
The shell Statement
The shell statement is the main way to run commands in Cicada. The shell statement allows you
to run commands and as well as execute inline shell code in your workflow.
Arguments passed to
shellare escaped before being passed to/bin/sh, though if used incorrectly, you still might be vulnerable to command injections. Please read the Security Considerations section for tips on how to better secure your workflows.
Examples
Here are a few examples of how the shell statement can be used in workflows:
Run a Command
shell npm install
This will run npm install in the current directory.
Pass Expressions as Arguments
let name = "Bob"

shell echo You name is (name)
Cicada will pass name as the argument for (name). The () notation is used to
differentiate from the typical $ notation used in shell.
Note you can use any valid Cicada expression as an argument, not just variable names:
shell echo 1 + 2 = (1 + 2)
The above workflow will print out 1 + 2 = 3.
Capture stdout
In Cicada you can capture and manipulate the stdout of a command by assigning it to a variable and accessing it's properties:
let cmd =
  shell echo Hello world!

print(cmd.stdout)
Running this workflow will print Hello world! *. Using stdout like this helps you
utilize more of what Cicada has to offer, without having to rely on shell scripts.
* An extra newline will be printed because the stdout from
echoincludes a newline, and.strip()to strip the whitespace before printing.
Note that when capturing command output, stdout and stderr will be merged into one.
Using Shell Features
You can also use shell to gain access to shell features like env vars, piping, and conditional
execution:
# Print the current directory
shell echo Current dir: $PWD

# Get the top 10 biggest files/folders in the "src" folder
shell du src | sort -nr | head -n 10

# Print message and exit if backup fails
shell ./backup.sh || { echo "Backup failed" && exit 1; }
While shell code can be very useful in writing your workflows, we encourage you to use the Cicada DSL instead of shell scripts wherever possible.
Run Shell Scripts
In addition to running single line shell commands, the shell statement can be used to
run larger, multi-line shell scripts:
shell "
  echo running tests
  ./run-tests.sh

  if [ $? = 1 ]; then
    echo tests failed
  else
    echo tests passeed
  fi
"
This shell script runs ./run-tests.sh and print whether the tests passed or failed
based on the resulting exit code.
Shell Aliases
Shell aliases are special identifiers that can be used directly without the need to prefix it with shell.
For example, the following are equivalent in Cicada:
shell echo hi

echo hi
These are the current commands that are allowed to be used as aliases, though this list may grow in the future:
cdcpechogitlsmakemkdirrm
Notes on Environment Variables
By default, Cicada will inject environment variables into each command before running it.
However, environment variables that are set while running a shell command will not
be saved.
For example:
shell echo ----
shell env

env.HELLO = "world"

shell echo ----
shell env

shell echo ----
shell export TESTING="123"
shell env
This will emit something similar to the following:
PWD=<CURRENT DIRECTORY>
SHLVL=0
_=/usr/bin/env
----
HELLO=world
PWD=<CURRENT DIRECTORY>
SHLVL=0
_=/usr/bin/env
----
HELLO=world
PWD=<CURRENT DIRECTORY>
SHLVL=0
_=/usr/bin/env
Notice that the HELLO env var is passed to the next commands, but TESTING
is not.
Using Secrets
For security purposes Cicada does not export secrets as environment variables. This means that you have to export secrets that you want to expose as environment variables:
# prints nothing
echo $API_KEY

env.API_KEY = secret.API_KEY

# prints API_KEY
echo $API_KEY
Security Considerations
Since the shell statement allows you to run arbitrary commands, it is
paramount that you ensure it is safeguarded from malicious users.
The shell statement will escape all interpolated arguments you pass to it,
though this alone does not stop all command injections.
For example, this workflow is safe as name is properly escaped via ():
let name = "hacker; echo Command injection"

shell echo Your name is: (name)
Running the above workflow results in the following:
Your name is: hacker; echo Command injection
As you can see, name was escaped and the command injection was not successful.
However, if we were to change the shell command to this:
shell eval (name)
We would get the following result:
Your name is: hacker
Command injection
While (name) does escapes the parameter, eval will execute the escaped
shell shell code, rendering the escaping useless.
In short, make sure that you do not directly execute untrusted code! Call commands directly like in the first example, and if you do need to call shell scripts, ensure you are only passing trusted input that you created, and ensure these scripts are not interpreting any inputs as shell code.
The import Statement
The import statement allows you to import modules into your Cicada workflow.
Currently only
.cifiles inside the cloned repository can be imported, but a package manager and/or remote import mechanism will be added in the future.
To import files, type import and then the filename you want to import:
import some/folder/file.ci
This will run some/folder/file.ci and automatically make all its functions and variables
available via file.some_variable.
Here is a full example of a workflow importing another module:
# module.ci

def greet(name: string):
  echo Hello (name)!
# workflow.ci
on git.push

import module.ci

module.greet(event.author)
This workflow will, on git.push, import module, then greet the commit author.
Restrictions
There are some restrictions on how files are imported:
- The filename must include the
.cifile extension. - The file must exist, otherwise the workflow fails.
- The filename must be a valid Cicada identifier. For example,
123starts with a number, and thus would be invalid.
In addition, there are also restrictions on what imported modules are capable of:
-
Imported modules do not have access to the
secretandenvglobal variables. To pass a secret/env var to code in a module, you will need to do so explicitly via a function argument. This is for security reasons, since importing a malicious module (directly or indirectly) should not automatically expose sensitive data like your secrets. -
The
cache,on,run_on, andtitlestatements are not usable in imported modules. This is because these statements only make sense when defined at the top level of a workflow. -
You cannot call functions annotated with
@workflowin imported modules. Imported modules are still able to define functions annotated with@workflow, but the modules themselves cannot call them. The reason being is that sub-workflows should be defined in the root of the workflow and not be hidden in a library function.
Expressions
Expressions make up a large part of the Cicada language, including your typical variables
and math/logic operations, as well as things you might not expect like if statements and
variable declarations. This flexibility gives you much more control over how you write your
workflows.
Keep reading to learn more about how to use expressions in Cicada!
Types and Literals
This is an overview of the different types available in Cicada, and how you can create them.
The Unknown Type
If you encounter this type, you usually have a bug in your code (or there is a bug in Cicada). This type is used when Cicada can't deduce what type you are trying to use, meaning you may need to include a type hint to tell Cicada what type it should be expecting (more on that later).
The Unit Type
The unit type, written as (), is the "nothing" type, similar to None in Python or void in C.
This type is useful when declaring a function doesn't return anything.
The bool Type
The bool type can only have 2 values: true or false.
The number Type
In Cicada, numbers are represented using a single number type, meaning there is no distinction between ints
and floats.
There are many ways to create an number in Cicada since Cicada uses the same number semantics as Python:
# basic positive/negative numbers
let num = 123
let neg = -123

# floating point numbers
let pi = 3.1415

# number separators are supported too
let big_number = 123_456_789

# binary, octal, and hexadecimal numbers
let bin = 0b11001100
let oct = 0o777
let hex = 0xABCDEF
numbers can be truthy. This means that in an if statement, non-zero numbers are considered true, and zero
is considered false:
let x = 1

if x:
  print("x is truthy")
Note: Under the hood Cicada uses the
Decimaltype to represent numbers. This means you can represent numeric literals with exact prescision and do most math operations with zero loss of accuracy. Since Cicada is not meant to be used for fast math operations, the overhead of using aDecimalshould not matter too much.
The string Type
strings are similar to strings in other languages, like Python:
let x = "Hello world!"
You can create multi-line strings by adding newlines between your string:
let text = "
This is a block of text.
This text will be on a new line.
"
The list Type
lists are still in the early stages, but you can use them to create a list of the same types.
Here is how you create a list in Cicada:
let nums = [1, 2, 3]
In this example, x is a list of numbers. The explicit type for lists are written as [T],
so in this example, x is of type [number].
Operators
This is a list of operators currently supported in Cicada:
| Operator | Supported Types | Result Type | Example |
|---|---|---|---|
+ | number, string | lhs type | 1 + 2 → 3 |
- (subtract) | number | number | 1 - 2 → -1 |
* | number | number | 2 * 3 → 6 |
/ | number | number | 10 / 2 → 5 |
mod (modulus) | number | number | 10 mod 3 → 1 |
^ (power) | number | number | 2 ^ 3 → 8 |
and | number, bool | lhs type | true and false → false |
or | number, bool | lhs type | true or false → true |
xor | number, bool | lhs type | true xor false → true |
is (equality) | any | bool | 1 is 2 → false |
is not (inequality) | any | bool | 1 is not 2 → true |
< | number | bool | 1 < 2 → true |
<= | number | bool | 1 <= 2 → true |
> | number | bool | 1 > 2 → false |
>= | number | bool | 1 >= 2 → false |
in | string | bool | "x" in "y" → false |
not in | string | bool | "x" not in "y" → true |
not | bool | bool | not true → false |
- (negate) | number | number | -(1 - 2) → 1 |
= (reassign) | any | any | x = 1 → 1 |
For all the above operators, the left and right hand side type must be the same. For example, the following is not allowed:
let x = 1 + "2"
The = (assign) operator is useful when you want to reassign a variable and use it in an
expression:
let mut x = 1

if x = f():
  # use x for something
The let Expression
The let expression allows for defining variables. A simple example of a variable
declaration would be:
let name = "bob"
Here we define a variable named name and assign it the string bob. By default,
all variables are immutable (ie, cannot be modified). The type of name is autodeduced as
type string because "bob" is a string.
Variables in the Cicada DSL are block-scoped, meaning they are only available in the block they define. Variables can also be shadowed, meaning they can be redefined without any errors:
let num = 1
let num = num * 2
In this contrived example above we first assign the value 1 to num, then create a new
variable (also called num) and assign it the value 2. Whenever num is referenced
now, the most recently assigned num, in this case, the second one, will be used.
Scoping
While let can be used as a statement (that is, on it's own line), it can also be used
in other expressions such as the if expression:
if let number = 123:
  echo your number is (number)

# Error, number is not defined here.
echo (number)
In the above example, number is created using a let expression. Since 123 is truthy,
the if condition passes, and the first echo command would be ran. The second echo
command causes an error though, since number is only scoped to the body of the if expression.
Mutable Variables
You can use the mut keyword to make a variable mutable:
let mut num = 123

num = 456

echo Your number is (num)
The if Expression
The if expression can be used to conditionally run code. Like most programming languages,
an if expression has a condition and a body:
let condition = true

if condition:
  echo this is the body
In this example, condition is truthy, so the body of the if expression runs the echo command.
condition can be any truthy/falsey type including bool, string, and number.
Like the name implies, if expressions are expressions, and can be used in conjunction with
other expressions:
let x =
  if true:
    123
  else:
    456
The result of an if expression is the last expression in the body, in this case, 123.
The body of an if expression is a special type of expression called a "block",
which you can read more about here.
elif
Use elif to add more conditions in case your first if condition isn't hit:
if x:
  echo x is truthy

elif y:
  echo y is truthy
else
Use else to execute code if no if/elif is hit:
if x:
  echo x was truthy

else:
  echo x was falsey
Scoping
Each if, elif, and else block creates its own scope. This means that variables declared
inside of those blocks cannot be used after the block has finished:
if x:
  let y = 123
else:
  let y = 456

print(y)  # error, y is not defined
To fix this, assign the result of the if expression to y instead:
let y =
  if x:
    123
  else:
    456
Or you can make y mutable and reassign it:
let mut y = 0

if x:
  y = 123
else:
  y = 456
With these scoping rules you can create new variables scoped to a single if/elif expression:
let name = " bob "

if let stripped_name = name.strip():
  echo Hello, (stripped_name)!

# stripped_name cannot be used here anymore
The above code will print Hello, bob!.
List Expressions
Lists allow you to store a collection of the same type. You can define a list like so:
let names = ["bob", "alice"]

let primes = [1, 2, 3, 5, 7, 11]
In the above example, names has a type of [string], and primes has a type of [number].
In Cicada, list types are written as [T] to indicate it's a list containing elements of type T.
When reassigning a list variable, the list type must be compatible:
let mut nums = [1, 2, 3]

# Error: Expression of type `[string]` cannot be assigned to type `[number]`
nums = ["a", "b", "c"]
List Functions
Currently you can't do anything with lists once you define them, though more functionality will be given to lists in the near future!
The Block Expression
The block expression is sort of an "invisible" expression, meaning you don't explicitly create them: They are implicitly created whenever you have an indented block. Blocks are essentially a list of expressions that get evaluated one after another, and the last expression of the block is the return value of the block expression.
For example:
let x =
  let y = 123
  y

echo (x)
Here we are creating an indented block, assigning 123 to y, then evaluating (ie, returning) y
from that block, which finally gets assigned to x.
Built-in Functions
Global Functions
hashOf()
Hash 1 or more files into a single hash. This function is useful for generating cache keys to detect when a file (or many files) have changed.
Things to note about the hashOf function:
- File globs are supported, so
file.*will expand to all files starting withfile.. - Every file explicitly passed (ie, not a glob) must exist. If a passed file doesn't exist, the workflow fails.
- After all globs (if any) are expanded, the file list is sorted before hashing.
Examples:
let hash = hashOf("package.json")

let hash = hashOf("docs/**/*.md")

let hash = hashOf("file1", "file2")
String Functions
starts_with()
Use starts_with to check if a string starts with another string:
if event.branch.starts_with("v"):
  # do something here
starts_with returns a bool type.
ends_with()
Use ends_with to check if a string ends with another string:
if event.branch.ends_with("-dev"):
  # do something here
ends_with returns a bool type.
strip()
Strip the start and end of a string:
let name = " bob "

print(name.strip())
This will print bob when ran.
strip() returns a string type.
Control Flow
Cicada currently only supports for loops, though more loop types will be added in the future.
The for Statement
The for statement allows you to repeat a block of code with with a given value:
for name in ["alice", "bob"]:
  echo hello, (name)!
Currently you can only use list types. Using non-list types is an error:
for x in 1:  # error: expected list type
  echo x
For statements are technically expressions, though they only return the unit type (()).
This may change in the future.
Like in other programming languages, you can use break and continue to change the control flow
of your program. break will break out of the loop, and continue will skip the rest of the loop
and start the next iteration:
for num in [5, 4, 3, 2, 1, 0, -1]:
  if num is 0:
    break

  if num mod 2 is 1:
    continue

  echo (num) is even and non-zero
Secrets
One of the most important part of any CI system is the ability to safely store secrets such as API tokens or connection strings.
Similar to GitHub, Cicada has a UI for creating and updating secrets, while the secrets themselves can only be read during the execution of workflow. Cicada supports 2 kinds of secrets: Installation secrets and repository secrets: Installation secrets are available to all workflows ran in a given installation, while repository secrets are only available to workflows ran in a particular repository.
Managing Secrets
To manage repository secrets, click on a repository URL (for example, in from "Recents" page), and you should end up here:
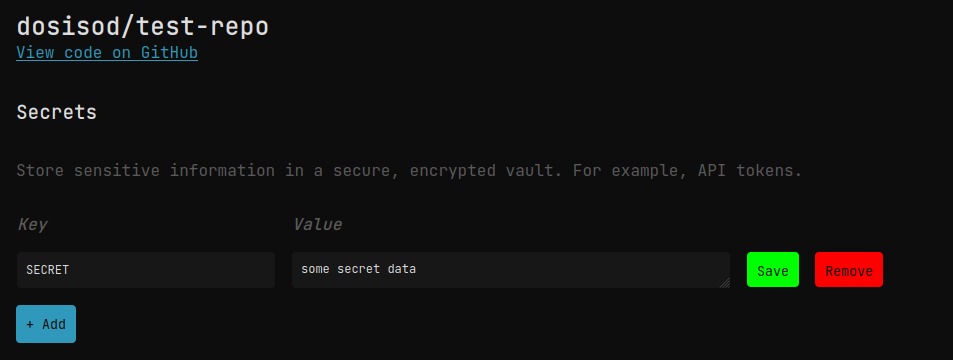
Here you can create, update, and delete secrets. You cannot view secrets directly as they are only available when running a workflow.
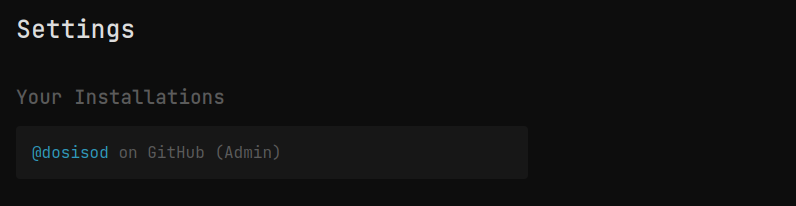
To create an installation secret, go to the "Settings" page on the dashboard, then find your installation:
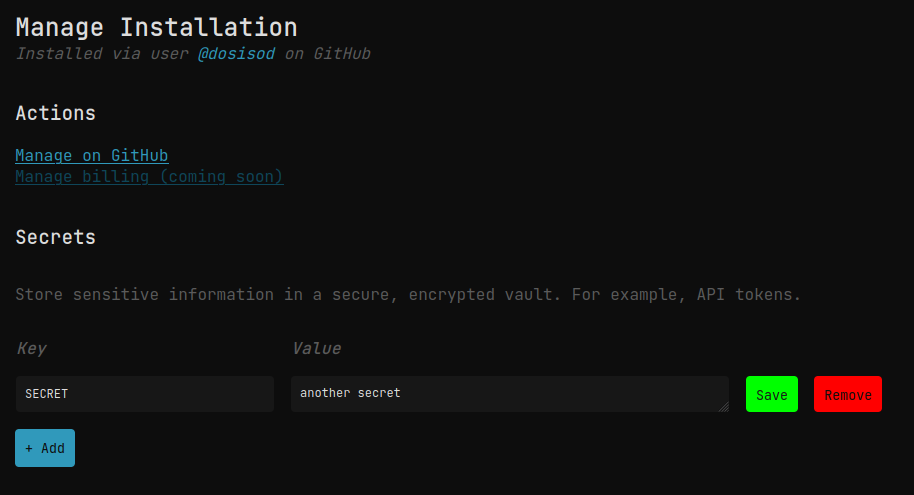
Once you click on your installation, you will have a similar screen where you can set installation secrets:
Using Secrets
To actually use secrets in your Cicada workflows, use the following syntax:
let token = secret.API_TOKEN

# or

shell command --api-token=(secret.API_TOKEN)
When Cicada runs your workflow it will pull all the available secrets (installation and repository wide), and inject them into your workflow. Repository secrets take precedence over installation secrets in the case that a repository and installation secret of the same name exists.
Note: workflows will fail if
API_TOKENis not set!
The secret global is immutable, meaning you cannot reassign a secret value unless you first assign it
to a variable.
Limitations
There are certain limitations to what secrets can do. Some of these restrictions may be relaxed in the future.
- Keys must be <= 256 characters
- Keys cannot be empty
- Keys must match the regex
[A-Za-z_][A-Za-z0-9_]** - Values must be <= 1024
* This is due to how secrets are accessed in Cicada workflows (ie, secret.ABC). Once Cicada supports
arbitrary strings as keys this restriction will be lifted.
Security
Protecting your secrets is our priority. Here are some of the security measures we've taken to ensure your secrets do not fall into the wrong hands:
- Secrets are encrypted using HashiCorp Vault via the transit engine.
- Secrets are sent to Vault to be encrypted with a key that is stored in Vault, and returned to be stored in Cicada in encrypted form. The reverse is done for decryption.
- A separate encryption key is created for each installation and repository, meaning no single key encrypts all the data. The encryption algorithm used is AES-GCM with a 256 bit key and 96 bit nonce (the default in Vault).
- Encryption keys auto-rotate every 30 days: The new keys will be used for encrypting any newly created or updated secrets, and any old keys will be used to decrypt old secrets. This is done in the background, so no action is required on your part.
- Vault is running on a separate, dedicated server, and uses mTLS to ensure only Cicada is able to communicate with it.
Please note that Cicada has yet to be independently audited for security vulnerabilities. While we try our best to ensure that Cicada is safe and secure, we are not security experts, and certain security considerations may have been overlooked. Only use secrets if this is an acceptable risk for you and/or your organization!
Caching
Caching files can speed up your automation workflows by reducing the amount of time spent recompiling or downloading resources that can be shared across many workflow runs.
Here is an example of how to use caching might be used in a NodeJS application:
on git.push

cache node_modules using hashOf("package.json", "package-lock.json")

shell npm i
In the above workflow we hash the package.json and package-lock.json files and use that as a
key for retrieving our cache. If the cache key already exists, the specified files will be restored.
If not, the files will be uploaded after the workflow finishes, but only if the workflow finished
successfully.
Keep in mind that caches will expire after 14 days. Users cannot change this (yet).
Limitations
Caching is an experimental feature right now, so there are some limits to what you can do:
- Each workflow file can only have one
cachecommand. - Cache key:
- Cannot be empty.
- Cannot contain the following characters:
:"'<>&+=/\. - Must be 256 characters or less.
- Cached files:
- Total file size must be less than 250MB before compression.
- Only files from the cloned repository folder can be cached. For example,
/and~/cannot be cached. This includes symlinks to outside of the repository folder.
Functions
Functions are user-defined bits of code that can be called directly in your workflows. Like normal programming languages, functions can have arguments, return values, and so forth.
Here is how you define functions in Cicada:
fn greet(name):
  echo Hello (name)!

greet("Bob")
When ran, this workflow will output the following:
Hello Bob!
Functions can optionally be typed. Here is the last function with explicit types added:
fn greet(name: string) -> ():
  echo Hello (name)!
When function arguments aren't typed they default to string types, and when no return type is
specified, the unit type () is assumed.
Since there are no explicit return statements yet, values at the end of a function block are implicitly
returned. See the docs on The Block Expression for more info.
When the unit type
()is used as a return type, no warnings or errors are emitted if you try to return non-unit type (such asnumber). This means you don't need to worry about explicitly returning()everywhere.
Sub-workflows
Sub-workflows are special functions that, when called, run concurrently in the background.
Here is an example of defining and using a sub-workflow:
on git.push

@workflow
fn test(version):
  echo Installing version (version)
  make install VERSION=(version)

  echo Running tests
  make test

for version in ["1.0", "1.1", "1,2"]:
  test(version)
This code will create 4 workflows: The "root" workflow, which is created automatically, and 3 sub-workflows which
are spawned from the root workflow. When calling functions annotated with @workflow, the filesystem of root
workflow is copied to the sub-workflow, meaning that any setup or caching done before calling test will be
included in the sub-workflow.
When using sub-workflows, the session will be finished when all sub-workflows are finished executing.
Limitations
Running processes are not preserved when creating sub-workflows, only the filesystem contents.
Self-Hosted Installation
This is an overview of how to install Cicada locally. This is only useful if you plan on self-hosting Cicada, otherwise, see our cloud-hosted version at cicada.sh.
If you would like to demo Cicada before installing you can demo Cicada using GitHub Codespaces.
Using Automatic Setup (Recommended)
Setting Up
Cicada has a "wizard" that walks you through the GitHub App setup process, which is used to receive events from GitHub and allow for login with GitHub support.
To get started, clone the repository:
$ git clone https://github.com/Cicada-Software/cicada
$ cd cicada
Setup a virtual environment and install packages:
$ python3 -m virtualenv .venv
$ source .venv/bin/activate
$ pip install -r requirements.txt
Run database migrations:
Note: This will need to be re-ran after each update.
$ python3 -m cicada.api.infra.migrate
Then start the server:
$ export CICADA_DOMAIN=yourdomain.here
$ export CICADA_USER=optional-username-here
$ python3 -m cicada.api
The CICADA_DOMAIN and CICADA_USER environment variables are used to setup/configure the
GitHub App.
CICADA_DOMAIN must be a publicly accessible domain that you own,
since GitHub will need to redirect back to this domain. This means you cannot use localhost
as a domain. If you want to use localhost you will need to setup a reverse proxy
such as ngrok. In addition, CICADA_DOMAIN must be a plain
domain name, that is, it should not start with https:// or end with /.
CICADA_USER is an optional string (typically your GitHub username) which is used to
create a unique app id for your GitHub App. If you don't set this environment variable,
a random string will be used to make your app id unique.
Creating GitHub App
Once you have started the webserver, navigate to the URL it tells you to (it should be or similar).
You should see a green button. Once you click it you will be redirected to GitHub,
where you will be asked to confirm the information and accept. Once you accept you will
be redirected back to the CICADA_DOMAIN URL you set earlier.
Assuming everything worked, a success message will tell you to restart the server.
That's it! You should see 2 new files: .env, which contains all the secrets, and cicada-key-*.pem,
which is the secret key used to authenticate your GitHub App with GitHub. Don't share
either of these files with anyone!
Using Manual Setup (Not Recommended)
If the automatic setup does not work, or you would rather do it manually, you can manually setup a GitHub App by reading these docs. You will need to clone and setup the repository like you do using the automatic method, so follow those instructions until you get to the "Start the server" section.
Setting Up Self-Hosted Runner
This is how to setup a self-hosted runner for use with Cicada.sh.
Note: There is no UI to setup or manage self-hosted runners at the moment. In order to get your runner ID and runner secret, please reach out to contact@cicada.sh to get started.
Install via Docker
To install using Docker run the following command:
docker run \
  --rm -it \
  -e RUNNER_ID="runner id here" \
  -e RUNNER_SECRET="secret here" \
  ghcr.io/cicada-software/cicada-self-hosted-runner:v1
You should see output similar to this:
[2023-08-08 13:24:02,265.265] [INFO] [site-packages/cicada-runner/__main__.py:54]: Attempting to read .env file
[2023-08-08 13:24:02,266.266] [INFO] [site-packages/cicada-runner/__main__.py:103]: Connecting to cicada.sh
[2023-08-08 13:24:03,094.94] [INFO] [site-packages/cicada-runner/__main__.py:171]: Connection successful
If you are having issues connecting try adding -e LOG_LEVEL=debug to Docker command to increase the verbosity.
If you are connecting a self-hosted runner to a self-hosted version of Cicada you will need to pass
-e CICADA_DOMAIN="your.website.com" to Docker as well.
Install Manually
Note: When installing Cicada on your local machine, workflows ran on your runner will have direct access to your machine. This is good if you need direct access to drivers or devices, but not great in terms of security. Only install manually if you have a specific need to do so!
Before you begin installing Cicada locally, make sure you have Python 3.11 installed. If you are using Ubuntu, read this Stack Overflow post on how to install Python 3.11.
Once you have Python 3.11 installed, create a new directory, create a .env file, and add the following:
RUNNER_ID="runner id here"
RUNNER_SECRET="secret here"
Replace runner id here with your runner UUID. Same for RUNNER_SECRET.
Then, install the runner and start it:
$ pip install cicada-runner
$ python3 -m cicada-runner